

Chicken Biryani Rice Cooker Style is an easy way to make a flavorful South Indian dum biryani at home using simple steps. This method is perfect for busy days when you want a comforting chicken biryani without constantly checking the stove.

Jump to:
About the recipe and some memories
Rice Cooker has been a regular appliance in my kitchen for many years. We make our everyday steamed rice in Rice cooker and leave on Keep warm until our lunch time. Over years, I have adapted to make chicken biryani in rice cooker as well.
Making biryani in a rice cooker removes the guesswork and lets the rice cook gently while the chicken finishes with a dum-like effect. Though a couple of steps are done on the stovetop, the final cooking happens in the rice cooker, making it much easier to manage.
This recipe has been a family favorite for years, especially when cooking for guests, as it is both convenient and reliable. If you enjoy simple cooking methods, you can also try my Vegetable Biryani, or chicken biryani in pressure cooker for more variations.
This easy chicken biryani works perfectly as a weeknight dinner or a simple weekend comfort meal.
Why Make Chicken Biryani in a Rice Cooker?
Making chicken biryani in a rice cooker is one of the easiest ways to prepare a flavorful and comforting meal without constantly checking the stove. The rice cooks evenly while absorbing all the spices and chicken juices, giving a dum-style finish with minimal effort.
This method is especially helpful for busy days or when cooking for family, as the rice cooker takes care of the final cooking stage while you focus on preparing the masala.
Ingredients Overview
This chicken biryani uses simple, everyday ingredients that come together to create rich flavors:
- Basmati rice for long, fluffy grains
- Chicken marinated with yogurt and spices
- Onions for fried garnish and depth
- Fresh mint and coriander for aroma
- Whole spices for authentic biryani flavor
You don't need any special ingredients - just basic pantry staples.
How to make the Chicken Biryani
Wash and cut the chicken into small pieces. Marinate in the curds, red chili, salt, ginger garlic paste. Keep it aside for at least two hours.
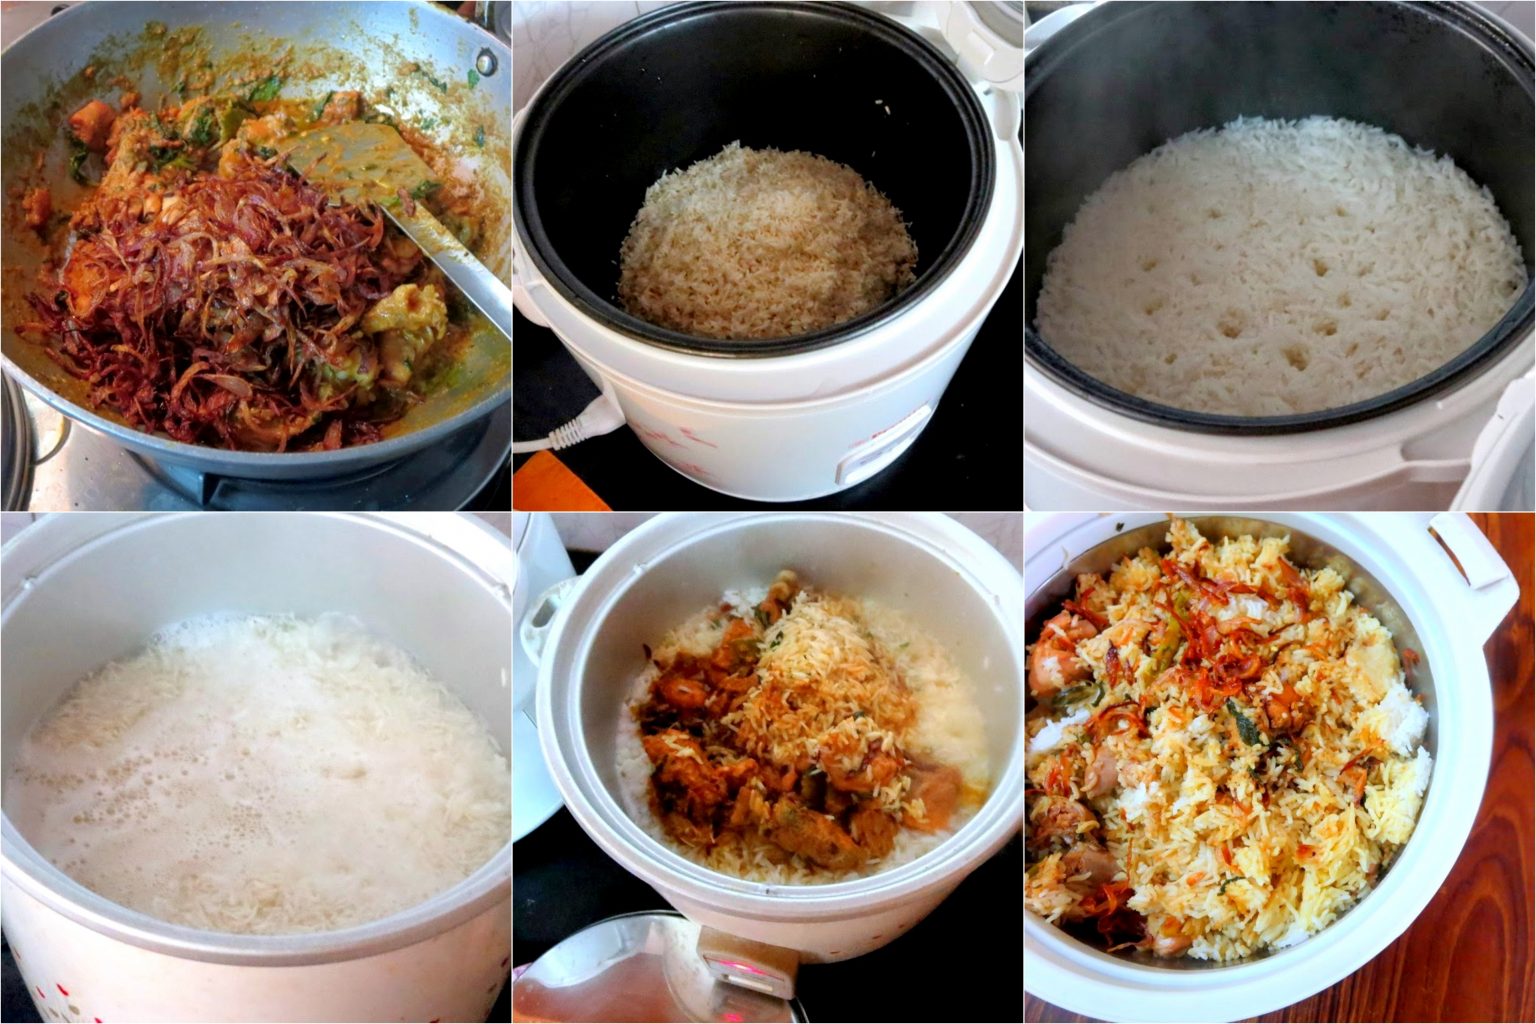
Wash and soak the rice for 20 mins. In the rice cooker, place the plate and add the drained rice, water, and salt. Press the cooker to the cooking Mode. This should be done when the chicken is almost half done.
Chop the onions as julienne and deep fry for roasted onions. Keep it aside.
Heat a kadai with oil and ghee mixture. Add the green chilies and saute well. Add half of the mint leaves, coriander leaves and saute well.
Next, add the chicken with the marinade and cook till the masala is well absorbed and almost dry. Add the ground spice masala. Mix well.
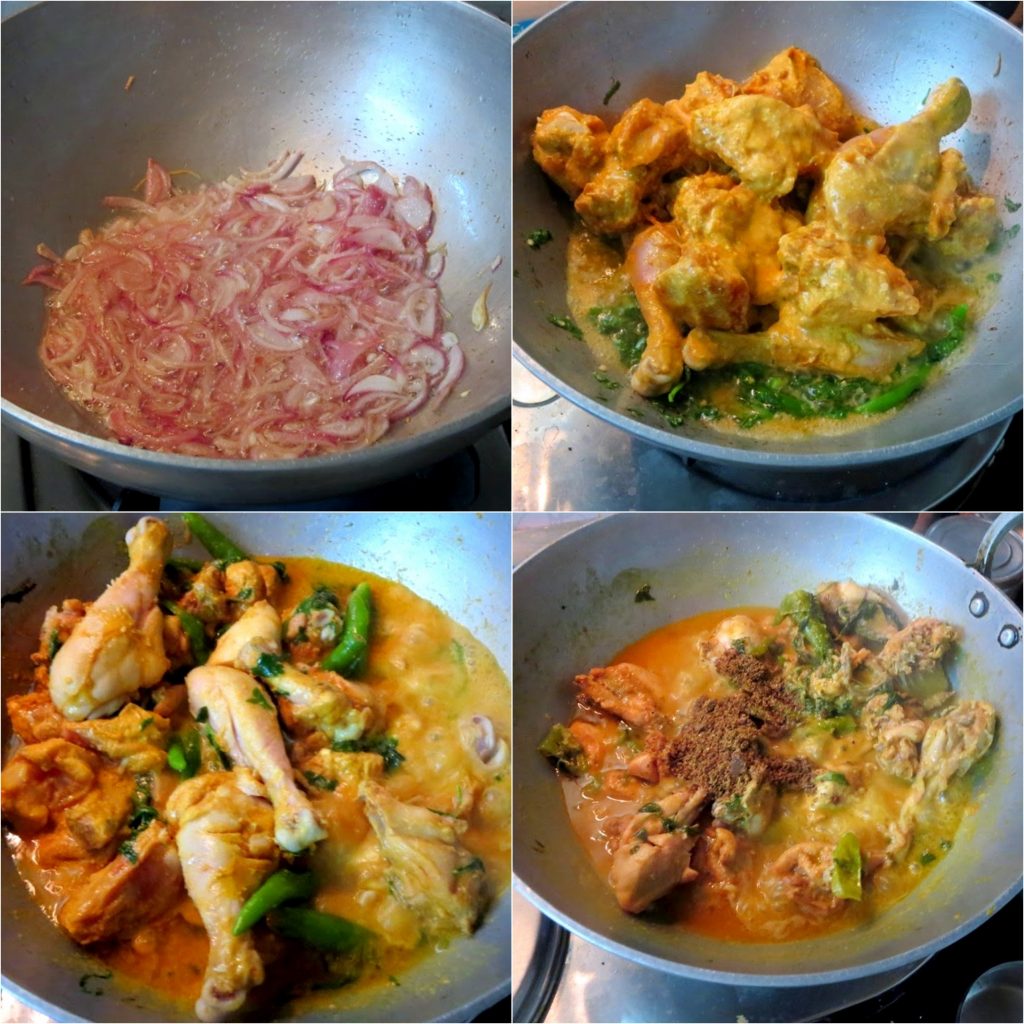
Add half of the fried onions to the chicken, along with the remaining mint leaves and coriander leaves.
Once the chicken is dry, add to the cooking rice. Mix well add the remaining fried onions (save a little for final garnish). Close the lid again. The rice cooker changes to keep warm automatically when complete.
Since the cooker continues to remain in the "Keep warm" mode, the biryani gets dum cooked.
Notes
Even if you are using regular rice, it's good if you add 1/2 less water than advised. The moisture from the chicken will take care.
Tips for Perfect Rice Cooker Biryani
- Soak basmati rice for at least 20 minutes for better texture
- Use slightly less water than usual since chicken releases moisture
- Cook the chicken until the masala is almost dry before mixing
- Don't skip fried onions - they add essential flavor
- Let the biryani sit in "keep warm" mode for a dum-like effect
These small steps make a big difference in taste and texture.
Serving Suggestions
Serve this chicken biryani hot with:
- Onion raita or plain yogurt
- Boiled eggs
- Simple cucumber salad
This makes a complete and satisfying comfort meal perfect for lunch or dinner.
Variations you can try
- Replace chicken with vegetables for a vegetarian version
- Add more green chilies for a spicier biryani
- Try Chicken Biryani in pressure cooker method for a quicker version
- Use brown rice (adjust water and cooking time accordingly)
These variations help you adapt the recipe to your preference.
Storage & Reheating
- Store leftovers in the refrigerator for up to 2 days
- Reheat by sprinkling a little water and warming gently
- Avoid overheating to prevent drying out the rice
FAQs
Some steps like cooking the chicken masala are best done on the stovetop, but the final cooking happens in the rice cooker.
This usually happens if too much water is added or the rice is overcooked. Use slightly less water and soak rice properly.
Yes, but reduce water slightly and expect a softer texture compared to basmati.
At least 1-2 hours for best flavor, but even 30 minutes works if you're short on time.
Pro Tips & Common Mistakes
Avoid these mistakes:
- Adding too much water
- Skipping rice soaking
- Mixing rice too much after cooking
Pro tip:
Let the biryani rest for a few minutes after cooking - this improves texture and flavor.
Recipe

Chicken Biryani ~ Rice Cooker Style
Ingredients
For the Chicken Marinade
- 1 kg Chicken
- 3/4 cups Thick Curds
- 1 tsp Ginger Garlic Paste
- 1 tsp Red Chilli Powder
- 1/2 tsp Salt
- A Pinch Turmeric Powder
To be Roasted and Ground
- 1 tbsp Poppy Seeds
- 4 Cloves
- 2" Cinnamon
- 3 - 4 Cardamom
For the Gravy
- 4 - 5 Green Chillies
- 1/2 cup Mint Leaves tightly packed
- 1/2 Coriander Leaves tightly packed
- 2 tbsp Cooking Oil + 1 tsp Ghee
- 2 big Onions to be browned
For the Rice
- 2 cups Basmati Rice
- Salt to taste
- 3 cups Water
Instructions
How to make the Chicken Biryani
- Wash and cut the chicken into small pieces. Marinate in the curds, red chilli powder, salt, ginger garlic paste. Keep it aside for at least two hours.
- Wash and soak the rice for 20 mins. In the rice cooker, place the plate and add the drained rice, water, and salt. Press the cooker to the cooking mode. This should be done when the chicken is almost half done.
- Chop the onions as julienne and deep fry to get roasted onions. Keep it aside.
- Heat a kadai with cooking oil and ghee mixture. Add the green chilies and saute well. Add half of the mint leaves, coriander leaves and saute well.
- Next, add the chicken with the marinade and cook till the masala is well absorbed and almost dry. Add the ground spice masala. Mix well.
- Add half of the fried onions to the chicken, along with the remaining mint leaves and coriander leaves.
- Once the chicken is dry, add to the cooking rice. Mix well add the remaining fried onions (save a little for final garnish). Close the lid again. The rice cooker changes to keep warm automatically when it is cooked.
- Since the cooker continues to remain in the "Keep warm" mode, the biryani gets dum cooked.
Notes
PIN This for Later!

This easy chicken biryani made in a rice cooker is a great way to enjoy a traditional dish with a simple, practical cooking method at home.




Lubna Karim says
Would love to try this way...sounds easy to me....Biryani looks droolicious....
Karishma Pais says
Looks gorgeous. I am a Biryaniholic, will try this one soon, but will have to make it in a normal pressure cooker
Arthy shama says
Wow... that is an one tempting prepartion. Love the biriyani 🙂
Suja Ilangovan says
I'm sure it tastes great, Valli! All those spices make it all the more aromatic!
jasmin says
Wow..biriyani..my all time favourite...droooooooling
Chef Mireille says
one of my all time fave dishes. this used to be my standard I would order at indian restaurants before I started exploring the unknown
nithya says
Thanku for this wonderful recipe..prepared it ..n everyone loved it:)..
Frenie says
I really enjoy your presentation of this delicious dish .. Keep it up and continue to share more recipe. More power to your site 🙂
Shanthini Jayanthan says
I will be trying this biriyani one day. Can I make it in the instant pot if I do not have a rice cooker ?
Srivalli says
Hi, I haven't tried it in instant pot, however, it should work if you have already made other veg biryanis.