• Skip to primary navigation
  • Skip to main content
  • Skip to primary sidebar

Cooking 4 all Seasons logo

  • Recipe Index
  • About
  • Navaratri Special
  • Our other Website: Spice your Life!
  • Nav Social Menu

menu icon
go to homepage
search icon
Homepage link
  • Recipe Index
  • About
  • Navaratri Special
  • Our other Website: Spice your Life!
  • Nav Social Menu

  • ×

    Home » Yeasted Bread » How to make Oats Honey Loaf ~ Step by Step

    How to make Oats Honey Loaf ~ Step by Step

    Published: Dec 2, 2014 · Modified: Sep 23, 2020 by Srivalli · 20 Comments

    Sharing is caring!

    0 shares
    Jump to Recipe Print Recipe
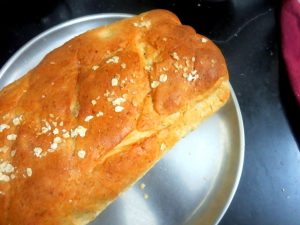
    We are starting the December edition of BM#47, with first week theme being Tame the Yeast. Since it was going to be a baked bread, I decided to take the easy way and club it with Bake-a-thon as well. Now the toughest part is going to be to bake the second bread!Today's first challenge was suggested by Veena. She had adapted it from Bakingdom.com. Her loaf turned out so heavenly! I had to use more milk than suggested as the dough was so tough and even after kneading it didn't look soft. So added extra milk and kneaded for 10 - 15 mins. The bread rose well, and had a good crumb. Though I still felt it wasn't as perfect as how Veena's loaf looked. All of us loved the bread though and the oats was surely a plus point.


    Oats Honey Loaf

    Ingredients Needed:

    All purpose flour - 3 cups
    Oats - 3/4 cup
    Hot Milk - 1 cup + 1/4 cup
    Luke warm Water - 1/4 cup
    Instant Yeast - 1 1/2 tsp
    Sugar - 1 tsp
    Honey - 1/4 cup
    Butter - 2 tsp
    Salt - 1 1/2 tsp

    How to make the Oats Honey Loaf

    If you are using Active dry yeast, you will have to proof, use 2 1/2 tsp with a tsp of sugar and luke warm water.

    I used instant yeast, Bring the milk to very hot temperature, add Butter to the hot milk and mix well so that it dissolves. Milk should be hot and not boiling

    In a bowl, take flour, oats, salt and mix well. Add the yeast, followed by honey.

    Slowly add the milk mixture to the flour yeast mixture and knead well. I had to use extra milk to get the smooth dough.

    Now continue to kneading for 15 mins. till the dough becomes soft and pliable.

    Transfer the dough to an oiled bowl, cover with a kitchen towel and let it rest in a warm place for 1 hr for it to double

    Now take out the dough to a wooden board and pat it into a rectangle approximately 9*5”

    Roll it into a cylinder, seal and tuck the sides in

    Place the seam side down in a prepared loaf tin, cover loosely and let it rise again for 45-50 minutes

    Preheat the oven to 185C

    Brush the loaf with honey, sprinkle some oats on it and bake it for 30-40 minutes or till the loaf starts to brown and sound hollow on tapping. I baked it for 30 mins, then covered the top with aluminum foil and baked for another 10 mins.

    Take out the loaf and remove the loaf and transfer the bread on a wire rack to cool

    Slice when completely cooled. Serve with your choice of side dish.

    Notes:

    As I have mentioned, I kneaded it with hands, you could use a processor as well. Also, I used more milk than it was mentioned by Veena.

    An InLinkz Link-up

    Recipe

    Print Pin
    No ratings yet

    How to make Oats Honey Loaf ~ Step by Step

    Dish Type Eggless Breads
    Author Srivalli
    Tried this recipe?Mention @cooking4all or tag #cooking4all!

    If you are looking for a soft Milk Bread, check the recipe

    More Yeasted Bread

    • Indian Masala Buns Recipe
      Masala Buns | Khara Bun Recipe
    • Focaccia Bread Recipe
      Easiest Focaccia Bread Recipe
    • How to make Milk Bread
      How to Make Milk Bread
    • Paneer Pizza Pockets
      Paneer Pizza Pockets ~ Ready in 30 minutes!

    Reader Interactions

    Comments

    1. vaishali sabnani says

      December 02, 2014 at 6:44 pm

      Valli that loaf looks really cool..it looks quite spongy ..and clubbing it up with another event is interesting. .love those bakeathon recipes.
      Will go through them at leisure. They are a treasure.

      Reply
    2. Priya Suresh says

      December 02, 2014 at 7:04 pm

      One can happily start the day with this healthy loaf..Well done Valli.

      Reply
    3. Varadas Kitchen says

      December 02, 2014 at 8:27 pm

      Lovely brown crust and a great looking loaf.

      Reply
    4. sripriya vidhyashankar says

      December 02, 2014 at 11:25 pm

      looks very soft.. nice.

      Reply
    5. Nivedhanams Sowmya says

      December 03, 2014 at 4:47 am

      the loaf has turned out so well.. Beautiful color and looks very soft!!!

      Reply
    6. Suma Gandlur says

      December 03, 2014 at 4:20 am

      I love the bread crust. Seems that your experiment was a success.

      Reply
    7. Suja Ram says

      December 03, 2014 at 11:01 am

      Great way to start the day with this healthy loaf!

      Reply
    8. Priya Srinivasan says

      December 03, 2014 at 2:08 pm

      Such a healthy loaf valli. Lovely color on top!

      Reply
    9. Kalyani says

      December 03, 2014 at 3:08 pm

      Super crusty loaf Valli !! Good job ????????????

      Reply
    10. Sarita says

      December 04, 2014 at 2:49 am

      Bread looks yummy.. Nicely done .

      Reply
    11. Usha says

      December 04, 2014 at 12:39 am

      Contrary to your experience, my dough was very sticky and a little loose. I sprinkled a little flour, just so I could knead the dough. Your bread turned out perfect and even I liked this bread.

      Reply
    12. sneha datar says

      December 04, 2014 at 3:56 pm

      A perfectly baked bread healthy and delicious.

      Reply
    13. Harini-Jaya R says

      December 04, 2014 at 9:44 pm

      Perfectly baked loaf, Valli.

      Reply
    14. Manjula Bharath says

      December 04, 2014 at 10:13 pm

      wow such an healthy and spongy loaf of bread 🙂 looks perfect !!

      Reply
    15. Jayashree says

      December 05, 2014 at 4:36 am

      That loaf looks wonderful, Valli. Beautiful color.

      Reply
    16. Chef Mireille says

      December 06, 2014 at 5:59 am

      your step by step photos are so detailed. A great guide for anyone.

      Reply
    17. Pavani N says

      December 06, 2014 at 11:07 pm

      That is a lovely looking loaf Valli. I made a no-knead oat bread for bake-a-thon, will post it soon.

      Reply
    18. veena krishnakumar says

      December 09, 2014 at 11:18 pm

      Valli the bread looks so good. A healthy twist isn't it!

      Reply
    19. Sandhya Ramakrishnan says

      December 17, 2014 at 4:00 am

      Valli, that loaf has come out so well. You have done an awesome job with the baking 🙂

      Reply
    20. Padmajha PJ says

      January 01, 2015 at 3:18 pm

      The bread looks so nice Srivalli.I am yet to bake this. Will try it oust some time soon.

      Reply

    Leave a Reply Cancel reply

    Your email address will not be published. Required fields are marked *

    Recipe Rating


    Primary Sidebar

    srivalli

    Hi! Seasons change, yet there are some timeless recipes you can enjoy anytime. If you are sport for it, you are in the right place!

    More about me →

    Popular

    • Chicken Biryani
      Chicken Biryani ~ Rice Cooker Style
    • No Onion No Tomato Aloo Sabzi
      No Onion No Tomato Aloo Sabzi
    • Ragi Sangati
      Easy way to make Ragi Mudda | Ragi Sangati Recipe Step by Step ~ Weekend Cooking!
    • How to peel Garlic and Pearl Onions in Microwave

    Most Popular Recipes

    Chicken Pakora Recipe

    Chicken Pakora Recipe | Crispy Chicken Pakoda

    Coconut Rava Halwa

    Coconut Rava Halwa

    Eggless Coffee Cake

    Eggless Coffee Cake Recipe

    Chicken Pakora | How to make Chicken Pakoda | Step by Step Recipe

    Footer

    ↑ back to top

    Privacy Policy
    Copyright © 2025 Cooking 4 all Seasons

    Rate This Recipe

    Your vote:


    A rating is required
    A name is required
    An email is required