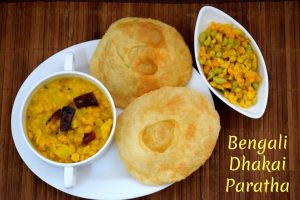
Bengali Dhakai Paratha is a century-old delicacy and is a traditional Bengali Paratha. It is a flaky layered deep-fried poori made with all-purpose flour having a hollow center in the middle.
Making and frying these pooris is an art and takes practice, as this is a unique paratha. It is called paratha though there is no resemblance to the regular pan-fried paratha. This Dhakai Porata belongs to the Luchi or Poori category, deep-fried and it puffs up in size and has layers resembling a laccha paratha.
Fried at the right temperature with the right amount of oil, results in the layers separating and you can easily see the layers once it is fried. For better understanding, we can say it is a cross between Luchi and Lachha Paratha.
Very similar to this Dhakai Paratha is the Porucha Parotta from Virudhunagar, Tamil Nadu. In the Virudhunagar Porucha Parotta, the regular flaky pan-fried parotta is deep-fried as pooris. However, as the rolled-out dough has a lot of layers already, we don't bother about getting the layers separated like this Dhakai Paratha.
So I was excited reading about a similar poori. Dhakai Porota or Dhakai Paratha is one of the most famous Bengali street food, equally popular on both sides of the border of Kolkata and Dhaka. As making these paratha requires skill and patience to make the perfect, these are slowly disappearing.
One another factor contributing to the level of expertise required to make these, these pooris are mostly bought from shops and enjoyed for a lazy Sunday Brunch.
Planning on making the Dhakai Paratha
I planned this fare for lunch and made Alu diye Cholar Dal along with Sweet Bondi. Knowing very well that the side dish will not meet my boys' or Hubby Dear's liking, I still went ahead. All of them loved the poori but the sweetish side dish was not liked. I didn't have a fallback dish and we managed somehow. However, the rest of the family loved it.
You will surely need some time on actually kneading the dough and layering out the pooris. The resting time and then frying will surely take up more than 30 minutes and it is good if you have a foolproof recipe to help you out. I have recorded a video to help with the rolling, kneading, and frying of the poori. Refer to this video .
As with all recipes, this one requires the right amount of ingredients to getting the perfect ones each time. However, unlike other ones, you need to take care you give the right amount of pressure for the layers to separate, for the pooris to puff up, etc.
I was super happy when we caught the perfect poori giving out the layers. These Bengali Dhakai Paratha are featured in the Bengali Dhakai Paratha Nasta Thali. While on SYL, it's a Punjabi Nasta Thali.

Thalis & Platters
Week 1 - Platters for Elders
Indo Chinese Platter for Day 1
Idli Platter for Day 2
Pakoda Platter for Day 3
Colourful Rangoli Food Thali for Day 4
Week 2 - Thalis featuring Non Veg Regional Cuisines - Non Veg Thali
Chicken Donne Biryani - Non Veg Thali 1 for Day 1
Raju gari Kodi Pulao - Non Veg Thali 2 for Day 2
Mutton Biryani - Non Veg Thali 3 for Day 3
Mutton Dum Biryani - Non Veg Thali 4 for Day 4
Fish Curry - Non Veg Thali 5 for Day 5
Prawns Curry - Non Veg Thali 5 for Day 6
Week 3 - Thalis featuring Indian Flatbreads
Banarasi Kachori aur Sabzi Thali for Day 1
PIN This for Later!


Step By Step Pictures for making Bengali Dhakai Paratha

How to make Dhakai Porota
All purpose flour or maida is rubbed with ghee a process called the moyan which helps the poori to become crispy and flaky during deep frying. This is the most important step for making these dhakai parathas.
Next comes rolling out the dough without having any cracks as you will end up getting a hard poori.
After the first cutting of the tips is done, gather them all and knead again well to make the cones again. This will result in pooris having many layers.
When the dipped cones are rested for 30 mins, gently roll them out to 6-inch discs and ensure you fry them in hot oil.
Frying the Pooris
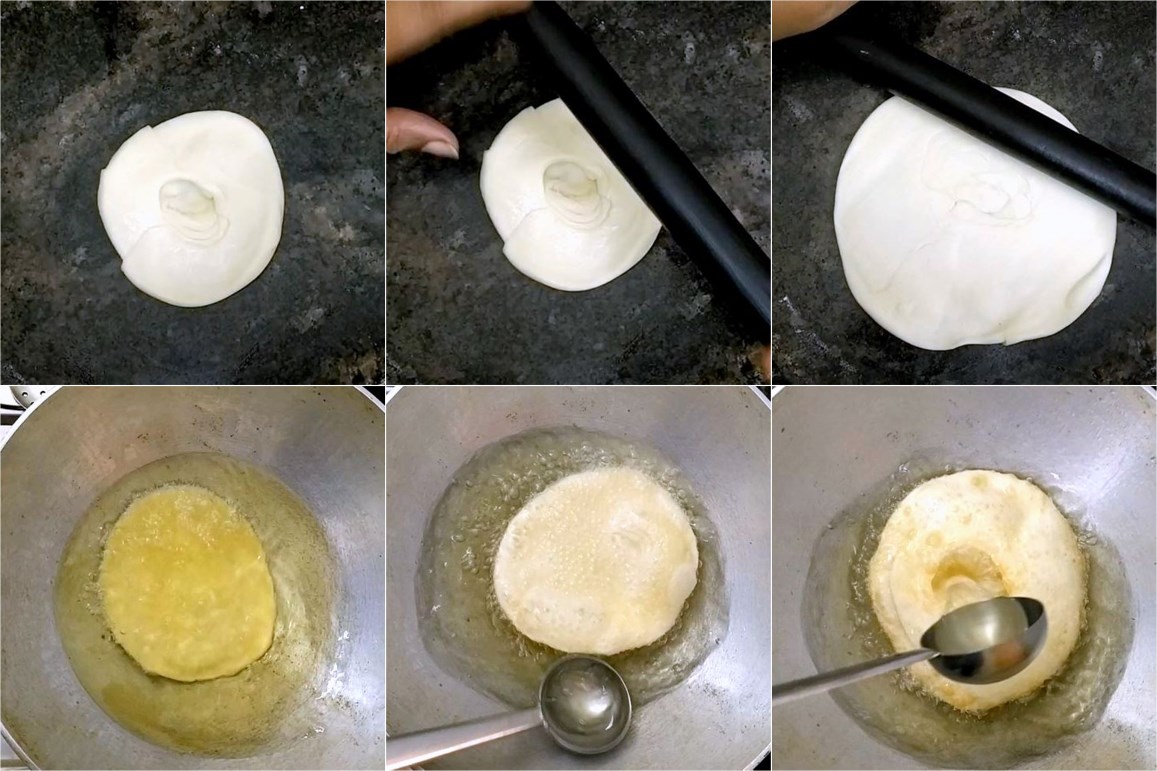
On dropping into hot oil, the pooris will come up right away. This is the stage when you start pouring hot oil in the middle. This will help the layers separate and the hold to form.
Cook on both sides and when ready to remove, tilt it on the side until you find almost all the oil is drained.
Transfer to a kitchen towel and let it stand for at least 5 to 7 mins. It is suggested that these pooris are stacked and kept for 20 to 30 minutes or even some hours.
As these pooris will have excess oil in between the layers, it is very important that you drain it well before enjoying it.
However, I don't know, I always want to serve the pooris hot.
Serving Suggestions
Dhakai Paratha should be served after draining the oil as much as possible, preferably after 15-20 mins. Dhakai Porota should not be served immediately, right after frying. This is the standard instructions. However, I served after it was left to drain after 10 minutes as I don't like serving cold pooris.
Unlike regular pooris, it is not advisable to store this Paratha for later consumption. The hidden oil between layers can turn it inedible even after 6-7 hours of storage.
Serve it with Alu diye Cholar Dal, or even with Alur Torkari with Chana Dal.

Recipe
Bengali Dhakai Paratha
Ingredients
- 2 cups All Purpose Flour
- 1/4 cup Flour for layering
- 3 tsp Ghee
- 1/4 cup Cooking Oil for layering
- 1/2 cup Water cold, for kneading
- Cooking Oil for deep frying
Instructions
Kneading the Dough
- Take a wide bowl with the flour, add the fat and rub well. This will help paratha become crispy while frying. We call this process as moyan.
- Now, slowly add cold water little by little to flour mix and start kneading with fingers. You should knead to a stiff dough as it will soften after resting.
- Keep the dough in a bowl and leave it for 30 mins. Cover with a lid or wet kitchen towel.
Rolling out the disc for frying
- After 30 mins, take the dough and knead again.
- Divide the dough into equal balls and roll again to get a smooth ball.
- Dust the rolling board, and using a rolling pin, roll each ball to form a circular disc.
- The disc should be little thicker than luchi/ poori. Roll out as wide as you can.
- Pour few drops of cooking oil on the disc and spread evenly all over.
- Then, sprinkle 1 tsp flour on top of oil and spread as evenly as possible.
- Now, take a sharp knife and cut along the radium of the circle; meaning from center towards the circumference or the outer line of the disc. Watch the video for clear demonstration.
- Take the corner of the cut and roll it along with the circumference (edge) into a conical shape towards top.
- Take the cone, and loosen the layers and tuck the loose ends of the outer larger part inward into the the cone.
- Place the cone on the board horizontally with the bigger part towards your left.
- Using a sharp knife, chop about 1 inch in the middle. You will be left with a small cone.
- Dip the chopped side of the larger cone in oil and place it in a bowl with the side dipped in oil facing up.
- Continue with all the balls.
- With the remaining small pointed dough, knead again to form cones and continue the same.
- Once you have rolled all, set aside and cover with damp cotton cloth. Allow to rest for 30 mins.
Making the Paratha or Flaky Poori
- Now, take one cone at a time and push your little finger inside through the narrow part of the cone from the side dipped in oil.
- Roll it gently to make a small hole. Since this has oil, it will be smooth to form a well.
- Place the cone on rolling surface and press the cone gently from top, gently using a rolling pin roll out into a 6 inch disc.
- Make sure you don't press too much else the layers will merge.
- The rolling should be done gently so as not to close the flaky layers.
- Continue with all the balls and keep it ready before frying them.
Frying the Dhakai Porota
- Heat a kadai with enough cooking oil. Once oil turns hot, simmer the flame.
- Add one dhakai paratha slowly in the hot oil. Firstly, it will go down to the bottom of the kadai and immediately will float back on the top.
- Now, using a ladle, start pouring hot oil over the middle part, where the layers will give way to form a hole.
- Press well to cook till the poori/ paratha making sure the pooris are evenly cooked all over.
- Turn to the other side, and cook.
- Once paratha is nicely coloured and crispy, remove from oil with a slotted spoon. Tilt it halfway and hold it for few seconds to discard excess oil.
- Drain to a kitchen towel for the excess oil to drain off that may still be there in the layers.
- Fry rest of the paratha in same manner.
- These flaky Dhakai Paratha are served with street style Alu diye Cholar Dal and mishti.
Notes
- Dhakai parathas are not served right as the pooris will have some oil in the layers. Let it sit for 5 to 7 mins before serving.
- Moyan or adding fat into the flour and rubbing it well is very important as this helps in creating layers or flaky end product.
- Add cold water to enable the fat covered with flour. So make sure you add the water slowly to knead to stiff dough. This dough rests for 30 mins and if you knead it too soft, you will end up with a loose dough. The final ready dough should still be stiff.
- The dough should be kneaded well so as not to get any crack. You should also roll it out carefully else if cracks form, it will dunk oil or become very crispy.
- On the final rolling out, you should not apply too much pressure as the layers till get merged.
- Frying these flaky pooris at the right temperature is very important as the layers separate with the right hot. So check if the oil is hot enough by dropping in a tiny dough. The dough should sizzle up and you know the temperature is correct.
- The moment the poori comes up, you should pour hot oil over the middle for the layers to separate.
Simmer at this stage and pour enough hot oil over it. Then flip over and cook on both sides again. - Keeping the fried pooris tilted over the kadai sides, will ensure all excess oil to drain off.
- Make sure all the oil is drained off. Since this is deep fried and if it has oil, the pooris will become soggy and not be fit to be consumed.


Vaishali says
Such a beauty ! I loved this Dhakai Parota , and have a good mind to make it .It surely is an art to roll as well as fry these pooris, but definitely worth trying . The flaky pooris must be tasting so good .
i checked the video , thanks to Konda for making it. It surely is helpful .
Suma Gandlur says
I did the same rolling with one of the parathas I made recently and know they end up being flaky. I surprised the pooris are called parathas but they would be yummy with a spicy side dish, I am sure.
Harini Rupanagudi says
I love the unique rolling method. They look super cute. The flaky pooris somehow reminded me of pheni.
srividhya says
That looks like one tricky poori but you have made it so well and its sooo good. Love it.Bookmarking it.
Renu says
That looks quite a lot of effort but worth it. that flaky layers will be so yum with the sabji.
Narmadha says
Love your detailed instructions and step by step pictures. So helpful for beginner. Dhakai paratha looks too tempting and flaky.